Reverse Engineering AES Keys From Unreal Engine 4 Projects
This post is designed for Windows builds of Unreal Engine 4 titles made with 4.21. This will likely work with previous versions, and maybe even future versions of the engine. Your mileage may vary.
Disclaimer
Note: I will not be helping you find keys for specific titles. So don't ask. This post is to share some knowledge on how you generally go about doing such a thing and is for educational purposes only.
This guide is for use with your personal projects only. Do not steal copyrighted material from commercial projects, this is illegal. Modifying commercially available games for redistribution is illegal.
There are a lot of people online who do this regularly for released games, but I haven't found anyone explaining how you actually achieve it. I hope to try and stop this being sacred knowledge and expose how this is done for others online and any other game developers so we can learn how these things are achieved, any maybe even improve game data encryption in future!
For this tutorial I have built my own test game with an encrypted pak index. I would highly recommend building your own encrypted Unreal Engine game to test this on as practice. My key for this test was:
pzq1+cZGipLozoSKnxO/vLeOunJWRFSBPUC+bZiLIsQ=
Also of note, this is just my approach to the problem. I do not know how other people achieve this (I didn't know who to ask, and couldn't find anything on Google), but I suspect anybody else is doing something similar (if not absolutely identical). So, let's get hunting!
What We're Doing
Some games encrypt their data files to try and avoid people from seeing the source assets. This is usually done with an encryption key. At some point the game must have this key in memory in order to perform the decryption process. Our goal is to stop the game at this exact moment and read the key from memory so we can use it ourselves.
Tools Needed
- Game/Application to analyse
- Unreal Engine from the Epic Games Launcher - download the correct version for the target game (see below)
- GFlags - https://docs.microsoft.com/en-us/windows-hardware/drivers/debugger/gflags
- x64dbg - https://x64dbg.com/
- Patience and calmness - https://mynoise.net/NoiseMachines/osmosisDroneGenerator.php
Determining Unreal Engine Version
You want to check the version of Unreal the game was made in so
Find the directory the target game is installed in and browse to:
[GameName]/Binaries/Win64/
You will see an exe in this directory called [GameName]-Win64-Shipping.exe. Right click this and select "Properties".
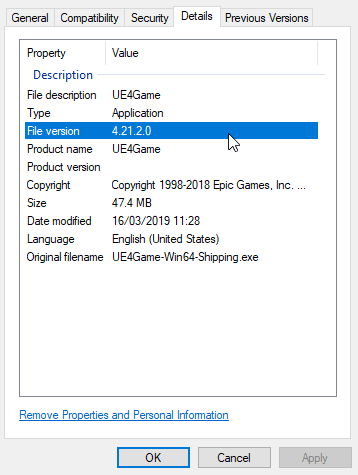
Go to the "Details" panel and check the file version. This will tell you the version of Unreal the game was built with. Here this test game I built was created in 4.21.2. The latest 4.21 will do fine, if you can get the exact version that is ideal, but likely all 4.21.x releases will be similar enough for this.
Do We Need The Key?
First things first, please check you actually need the key. Find the directory the target game is installed in and browse to:
[GameName]/Content/Paks/
There should be a pak file in this directory. This contains the main content for the game. Some titles may include multiple pak files. You'll need to figure out which one contains the main bulk of the game assets, other files will likely be DLC or mods.
The Unreal Engine comes with a tool called UnrealPak.exe. You can find this at:
[Unreal Engine Install]/Engine/Binaries/Win64/UnrealPak.exe
You can use this to run commands on the pak file we found above.
For example, we can test the file to see if we can open it, passing in the full path of our pak file:
[Unreal Engine Install]/Engine/Binaries/Win64/UnrealPak.exe -Test [PAK FILE PATH]
If you get an error message like:
Assertion failed: Key.IsValid()
Then off we go! We need to supply a valid key, so let's go hunting for it. If you get a different error, you probably have a different (or an additional) problem to solve, and probably not going to get much luck from this blog post.
If you got a long list of asset names, then congrats! Your pak file isn't encrypted. You also now have the correct tool to extract the files, try the "-Extract" function instead of "-Test".
Getting Setup
Boot up Unreal Engine and create a new code project using the same version the target game was built in. It's important the engine version you are using matches the one used to build, so that the code we'll be reading matches the game.
Once you have created your project, open the solution in Visual Studio. This will allow you to browse the source code for the Unreal Engine. We want to find where the engine gets the decryption key.
In 4.21, the decryption key is fetched using the function "FPakPlatformFile::GetPakEncryptionKey". This is called in IPlatformFilePak.cpp in the function DecryptData().

Using your favourite source code software (I'm using VisualAssist - Intellisense will do if you want to be angry all the time), look for how this function is called. We're looking for strings that will be in the Shipping exe to use as a landmark for us to look for in the actual game EXE.
Here VisualAssist tells me that a few functions call our DecryptData function. But the one we're interested mainly is LoadIndex. This is the part of the pak file that contains the asset listing. It is loaded first by the engine and is often the only part that is actually encrypted.

It is often only the index that is encrypted because all this encryption/decryption takes a long time to do, and developers don't want to significantly increase loading time of all the game assets. Just encrypting the index still makes the file useless without the key, but makes the decryption time negligible.
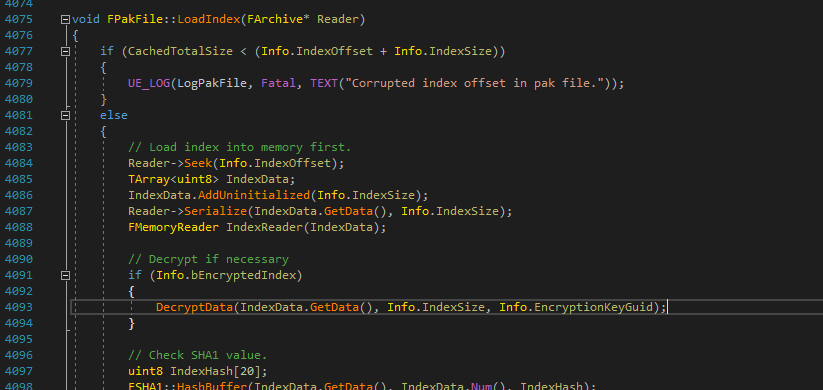
Now we're looking at that LoadIndex function. We can see there is a Fatal error at the top of the function. This is useful to us, since Fatal errors won't be stripped out of Shipping builds. Normal log lines will usually be removed from Shipping builds as they're not needed and will just slow the game down, but Fatal errors will show up in the final game, so we now have some text we can look for.
We will now want to start debugging the target game and looking for this "Corrupted index offset in pak file." string.
Attaching To The Game
Most games have some sort of launcher or third-party integration that stops you directly launching the game. To try and avoid this, we're going to use a tool called GFlags. GFlags allows us to attach a debugger to any EXE as soon as it is launched.
Find your install of GFlags and run it. By default it will be here:
C:\Program Files (x86)\Windows Kits\10\Debuggers\x64\gflags.exe
Navigate to the Image File tab.
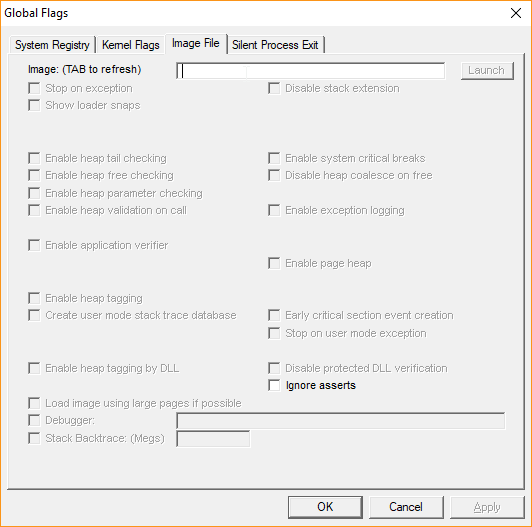
Here you want to type the name of your game EXE. This is the one with "-Win64-Shipping" in the name. For example, my game "RealGame" is called "RealGame-Win64-Shipping.exe". This should be just the file name and extension, not the full path.
Press TAB to refresh the UI and go down to "Debugger". Tick this box and enter the full path name of the x64dbg.exe from x64dbg. This should be in x64dbg\release\x64 or similar in the download.
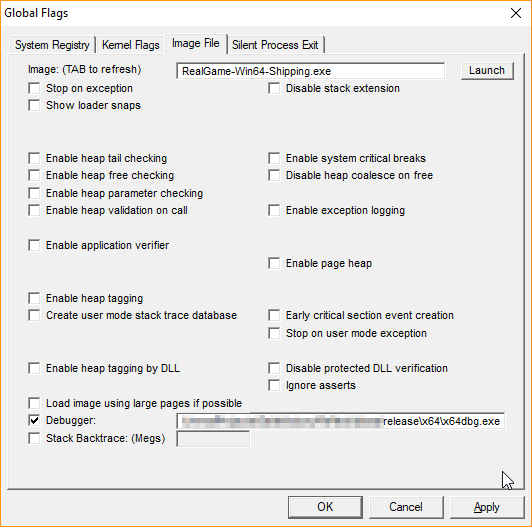
Click Apply and launch the target game. You should get x64dbg instead of the game. Congratulations! We're now "attached" and debugging the game in real-time.
Finding Our Error
So earlier we identified the string "Corrupted index offset in pak file." was hit just before our DecryptData function.
Right click within the main window and navigate to "Search for -> All Modules -> String references"
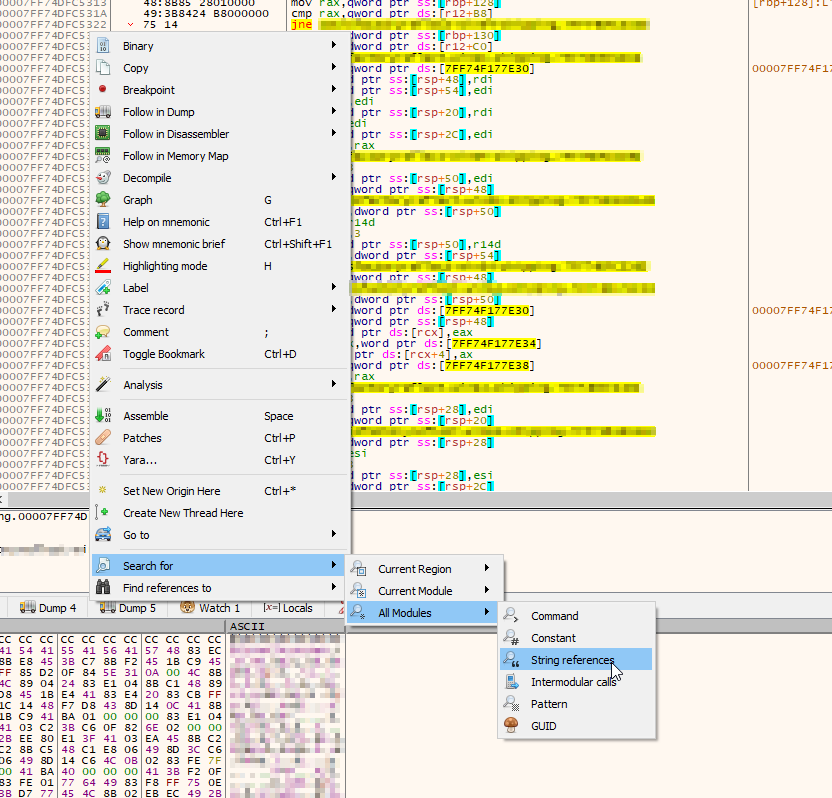
The next window with have a progress bar at the bottom. Is is best to wait for this to finish before continuing! Once done, type "Corrupted index offset in pak file." into the Search: box towards the bottom.

Success! We've got a few hits. These are in the same rough memory area, so it looks like this actually the same code block. Double-click one of these to jump to that area of the EXE to have a look.

An important part of this process to to understand roughly what's going on here. This is the low-level code of the EXE. Important things to note:
- Commands starting with j - these will usually "jump" to somewhere else
- "call" - will jump to a function in a specific module
In the above screenshot, we can see the x64dbg is being very helpful and showing us the jumps on the left side of the window. We can see the line starting with "jge" will jump over our error message if a condition is true (jge means "jump if greater or equal to"). Because this is jumping straight over our error message, it looks like we're in the correct spot. Those lines correspond exactly to the code we saw earlier:

And this is the main part of the puzzle now. We're going to debug this game gradually, following the structure of the EXE and comparing it to UE4 to figure out where we are. Once we're at the DecryptData function, we can look up our memory values and get our key.
Clicking the bobbles at the side of the window will set breakpoints. You will want to set a breakpoint within this area of the code we've found, and hit the "Run" button until we hit our breakpoint.
Note: by default x64dbg breaks on lots of various events. I turn all of these off under "Options" -> "Settings" -> "Break on:". This will save having to continue past lots of breakpoints.
Let's take a look at our LoadIndex function in more detail.
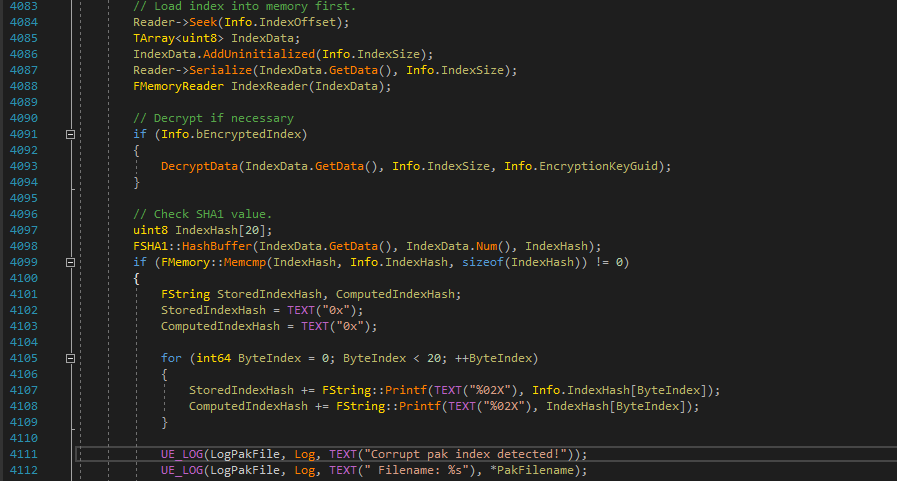
We have three main sections here.
- Array Initialisation
- Optional Index Decryption
- SHA Checking
The first block is fairly simple, and will look relatively straight forward in x64dbg.
Our decryption step will be within a pretty small jump and call a module function somewhere. This should be easy to spot.
The SHA hashing has a bunch of memory setup, a huge branch, and a for loop (which is just a complex jump when you're this low-level).
Let's look at our x64dbg again.
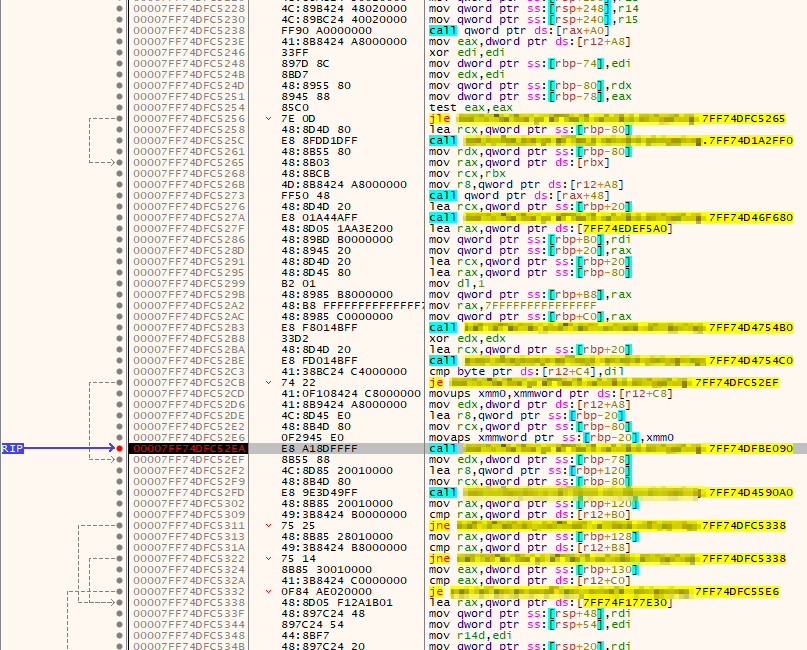
Looks like we have a small jump, another small jump, and then a bunch of complex jumps.
What's up with the two jumps? The last section is clearly the SHA hash starting, but there is only one if statement before that?
Above we had a call to "AddUninitialized". This is what is called an "inline function". When it is called, it's execution is basically injected into where it was called from, rather than jumping around in memory.
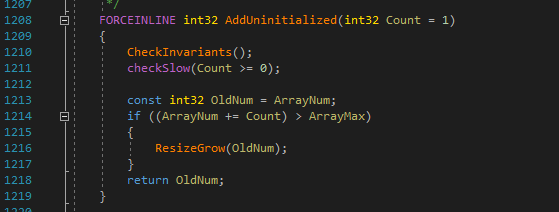
As we can see, this function has its own if statement. So if it's inlined into the calling function, it will add this branch there. This explains the first branch we see. Because of this, we can assume that the second small branch is the one that does the encryption. You can see I have already added a breakpoint at the module function call, as this is where I want to start debugging.
Debugging
Now we're attached, debugging, and in the right place. Make sure we've got our breakpoint at the module call and we've run through the application until we hit it.
Now we want to run "Step Into" (F7). This will jump into the function we're currently on, then immediately halt the game again. This will take us to where the DecryptData function is in the EXE.
Now let's check our code again.

We have a key variable initialisation, then it is fetched, then we decrypt the data. The check() should be compiled out of Shipping builds, so we can ignore that bit.
Because the variable initialisation might be fairly complex, let's start at the bottom of the EXE code and work back up.
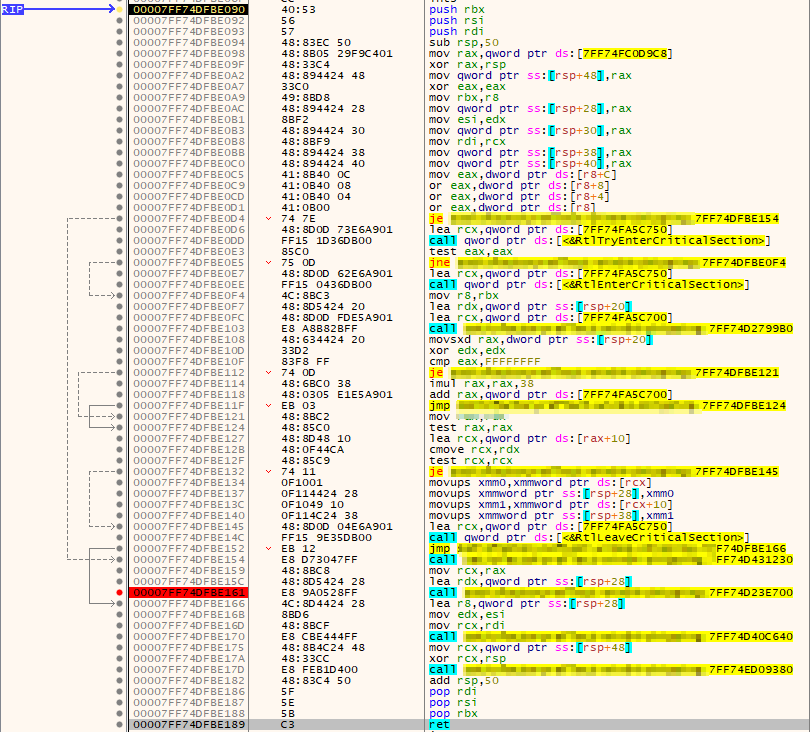
At the top we have multiple "push" commands. These usually indicate the state of a function.
Right at the bottom we have a "ret" command. This is usually the function end (the return).
Working upwards, there are a few module calls, I reckon these are the final DecryptData function call. The DecryptData function the C++ calls is quite small and calls a different variant of DecryptData, so the compiler likely inlined it here by itself to optimise. Compilers do a lot of optimisations that will make the final EXE appear different to the original C++, be prepared to approach this by making a lot of guesses and hunches, which will quite often be wrong causing you to backtrack and start again.
The goal now is to step through and start looking at our memory. Above I have added a breakpoint where I think we're getting the decryption key. So I continue running until I hit that point, then I hit the "Step Over" (F8) debug button to run the module function in it's entirety (I don't care how it gets the key, I just want it to get it).

Once we've stepped over, pay attention to the section to the right of x64dbg (I've screenshotted the moment I stepped over above). This shows us our registers (just keep going if you don't know what that is, we'll be fine). The ones highlighted in red changed in the last debugging step. Right click each one and choose "Follow in Dump", then look in the "Dump 1" window at the bottom of x64dbg to see what is there.
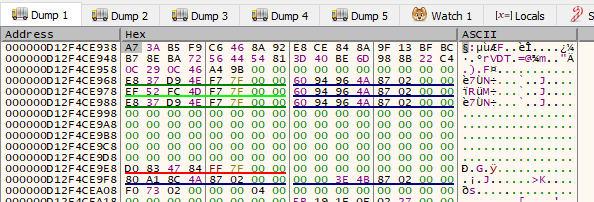
Here, my RCX register has the correct key for my imaginary game. Which is "A73AB5F9C6468A92E8CE848A9F13BFBCB78EBA72564454813D40BE6D988B22C4".
This is in Hex, and you will want to convert this into Base64 for Unreal. I just Googled "Hex to Base64 encoder" and found plently of sites for this.

And boom! There is our AES key.
How To Use
UnrealPak.exe accepts a "crypto.json" parameter. You will want to create this file somewhere and add the following:
{
  "$types": {
    "UnrealBuildTool.EncryptionAndSigning+CryptoSettings, UnrealBuildTool, Version=4.0.0.0, Culture=neutral, PublicKeyToken=null": "1",
    "UnrealBuildTool.EncryptionAndSigning+EncryptionKey, UnrealBuildTool, Version=4.0.0.0, Culture=neutral, PublicKeyToken=null": "2"
  },
  "$type": "1",
  "EncryptionKey": {
    "$type": "2",
    "Name": null,
    "Guid": null,
    "Key": "pzq1+cZGipLozoSKnxO/vLeOunJWRFSBPUC+bZiLIsQ="
  },
  "SigningKey": null,
  "bEnablePakSigning": false,
  "bEnablePakIndexEncryption": true,
  "bEnablePakIniEncryption": true,
  "bEnablePakUAssetEncryption": false,
  "bEnablePakFullAssetEncryption": false,
  "bDataCryptoRequired": true,
  "SecondaryEncryptionKeys": []
}
Here you can see the key, and some settings for how it is used. My test game encrypted both the index and the ini files (configuration files). You will need to play with these if you aren't having luck and the developer has encrypted all their files.
Test your pak file just like before, but adding the -cryptokeys= option
[Unreal Engine Install]/Engine/Binaries/Win64/UnrealPak.exe -Test [PAK FILE PATH] -cryptokeys=[LOCATION OF crypto.json]
I recommend UModel for actually doing something with the resulting data. http://www.gildor.org/en/projects/umodel
Good luck!